|
Final Fantasy 7 Character bios
Below is my Party in FF7 and the Alignment is the same too!
Well, Whatcha think? ios here of the Playable Chars and the Non-Playabe ones. hehehe!
|
|
|
|
|
|

Main Playable Characters |
|
|
|
|
|
|
|
|
|
|
|
|
|
|

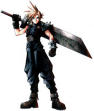
Birthday: August 19th
Birthplace: Nibelheim
Height: 5'7"
Weapon Type: Swords
Bio:
The main
character of Final Fantasy VII, Cloud grew up with Tifa in Nibelheim. He aspired to become a member of the elite Shinra group
of Soldier and be just like Sephiroth. He failed in his mission and met Zack. Him and Zack were with each other for a while,
going through many hardships until they got to Midgar. He then joined a group called Avalanche who rebelled against Shinra.
His rival is Sephiroth and his main goal is to destroy him. He holds a giant blade at all times and is strong enough to be
able to swiftly move the blade. |
|
|
|
|
|
|
|
|
|
|
|
|
|
|

Birthday: December 15th
Birthplace: Corel Village
Height: 6'4"
Weapon Type: Guns augments on his right arm.
Bio:
Barret
was born and raised in the mining village of Corel. When Shinra wanted to build a reactor there, the people refused but had
to accept. When Shinra believed that the people were abusing the reactor, they set out for destruction. Barret lost his right
arm in a skirmish with Shinra troops and after that, he had a gun put on the arm for his revenge on Shinra and started a group
called Avalanche which was hell bent on destroying Shinra. |
|
|
|
|
|
|
|
|
|
|
|
|
|
|

Birthday: May 3rd
Birthplace: Nibelheim
Height: 5'4"
Weapon Type: Gloves and Knuckles
Bio:
Tifa
grew up with Cloud, they were close at times, but a lot of other boys were around her most of the time so they could never
really get together. After Cloud left, Tifa became really sad and eventually left Nibelheim to go the Midgar. There she joined
the group Avalanche and started up a bar called 7th Heaven in Sector 7. |
|
|
|
|
|
|
|
|
|
|
|
|
|
|

Birthday: February 22th
Birthplace: Icicle Village
Height: 5'3"
Weapon Type: Rods
Bio:
Aeris
was born secretly in the Icicle Village and was soon taken by Shinra to Midgar. Her and her mother escaped to the Sector 5
slums. There, Aeris lives with Elmyra in her house. The Turks kept trying to capture her as she was the last of the Cetra
race and valuable to Shinra, but she kept eluding them. She is the best magic user in the game. |
|
|
|
|
|
|
|
|
|
|
|
|
|
|

Birthday: Unknown
Birthplace: Cosmo Canyon
Height: 3'7"
Weapon Type: Head-Dress
Bio:
Actually
a teenager still in his years, Red XIII grew up protecting Cosmo Canyon and believing his father was a traitor. He got captured
by Shinra and became a research specimen. He was eventually saved by Cloud and the group and also found the truth about his
father. His grandfather, Bugenhagen, is human, which makes no sense but who's to argue. |
|
|
|
|
|
|
|
|
|
|
|
|
|
|

Birthday: Unknown
Birthplace: Shinra Headquarters
Height: 3'2"
Weapon Type: Megaphone
Bio:
Cait
Sith was a fortuneteller in Gold Saucer when it met Cloud and the group. Reeve, Shinra's Head of Urban Development, created
it to spy of Cloud and the group. It eventually earned it's keep and became a permanent member of the group, though quite
useless. |
|
|
|
|
|
|
|
|
|
|
|
|
|
|

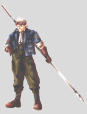
Birthday: February 22nd
Birthplace: Unknown
Height: 5'8"
Weapon Type: Spear
Bio:
Cid was
going to be the first man in space on Shinra's No. 26 rocket. When Shera screwed up his rocket plan, she decided to let Cid
live with her in Rocket Town. Cid is a tense man who swears a lot. He is the creator of such airships as the Highwind and
Tiny Bronco. |
|
|
|
|
|
|
|
|
|
|
|
|
|
|

Hidden Playable Characters |
|
|
|
|
|
|
|
|
|
|
|
|
|
|

Birthday: November 20th
Birthplace: Wutai
Height: 5'2"
Weapon Type: Boomerang and Shuriken type weapons
Bio:
Yuffie
is usually the first secret character you encounter. Found in most forests, you can encounter her even before going to Junon
for the first time. She was raised in Wutai, where she became a mischievous thief and left Wutai to try and find materia strong
enough to save Wutai from the tourism that Shinra had brought. It gets very interesting when she first returns home with Cloud
and the group. |
|
|
|
|
|
|
|
|
|
|
|
|
|
|

Birthday: October 13th
Birthplace: Possibly Midgar
Height: 6'0"
Weapon Type: Firearms
Bio:
Very
mysterious, the second secret character you find sleeps in Nibelheim. A former Turk, Vincent was in love with Lucrecia, until
an accident occurred which resulted in Vincent sentencing himself to life sleeping. Not much is known about his past, but
he does swear revenge on Sephiroth and Shinra. |
|
|
|
|
NPC's (non-playable)
No Pics Available yet...
|
|
|
|
|
|
|

Non-Playable Characters |
|
|
|
|
|
|
|
|
|
|
|
|
|
|
Sephiroth
Age: 30
Birthday: Unknown
Birthplace: Unknown
Height:
6'1"
Weapon Type: Masamune Blade
Bio:
Sephiroth was the main evil guy in Final Fantasy VII. He had certain
respect for Cloud but considered him unequal in power. The former head of Shinra's 1st class Soldier army turned evil after
realizing that he might be a monster created by Hojo. |
|
|
|
|
|
|
|
|
|
|
|
|
|
|
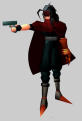
Rufus
Age: 21
Birthday: Unknown
Birthplace: Midgar
Height:
5'11"
Weapon Type: Shotgun
Bio:
Rufus was a cool, calm guy. The Vice President turned President of Shinra.
He had a lot of power, and wished to rule the world with fear. He wanted to find the Promised Land and kill Cloud along the
way. His pet Dark Nation, made a slight appearance but had no real story. Rufus wore a cool white trench coat, which held
his shotgun. |
|
|
|
|
|
|
|
|
|
|
|
|
|
|
President Shinra
Bio:
First name not actually
known. Father to Rufus, this old, fat and greedy man prefered ruling the world with money. He did pretty awful things in his
time on Final Fantasy VII but nothing is known about his history. |
|
|
|
|
|
|
|
|
|
|
|
|
|
|
Reeve
Bio:
Reeve was Shinra's Head of Urban
Development. He was in charge of keeping the people in Midgar happy. He despised Rufus and President Shinra for what they
did as Presidents. He suggested he would make a better President. He was also in charge of Cait Sith, whom he created. |
|
|
|
|
|
|
|
|
|
|
|
|
|
|
Heidigger
Bio:
Gwahahahaha. The annoying laughs
from Shinra's overweight Head of the Peacekeeping Division. His job was to prevent wars with other cities (although there
is no other army in the world). Rufus hated his laugh and I quote "Will you stop that stupid horse laugh!" from him. Heidigger
plans to rule Midgar all by himself. He was a big guy, but inside, he was weak. |
|
|
|
|
|
|
|
|
|
|
|
|
|
|
Scarlet
Bio:
The only woman executive of Shinra.
She was in charge of Shinra weapons hence her title Head of Weaponry. She kind of had a "thing" for Tseng going on which she
likes to keep secret. She was responsible for the creation and naming of the Sister Ray. |
|
|
|
|
|
|
|
|
|
|
|
|
|
|
Palmer
Bio:
The Head of the Space Division for
Shinra is an old, fat man who only cared about money. He became fat after the failed rocket mission which then Shinra decided
to abandon the space program because Mako energy was more efficient, which in turn left Palmer with nothing to do. |
|
|
|
|
|
|
|
|
|
|
|
|
|
|
Hojo
Bio:
Shinra's Head of Research and Development
and also it's top scientist, Hojo loved researching ancient and weird things. He captured Red XIII and wished to capture Aeris
for that reason. His pride and joy was his Jenova project. |
|
|
|
|
|
|
|
|
|
|
|
|
|
|
Tseng
Bio:
The leader of the Turks was a calm
guy whose job was to control the Turks and calm them down at times. He was one of the only people who knew Aeris for a long
time and he liked her. He also had a job to do and always put that first. |
|
|
|
|
|
|
|
|
|
|
|
|
|
|
Reno
Bio:
A Turk member. He had a cool attitude
to match his cool attitude. He got angry easily. He used an electrical rod as his weapon. He was usually around his partner
and they do some cool things in Final Fantasy VII but were always out to get Cloud and the group |
|
|
|
|
|
|
|
|
|
|
|
|
|
|
Rude
Bio:
Reno's partner was a calmer Turk.
He was completely bald and he didn't say much, except when talking to Reno, but he was still cool. He used his fists to fight
and his fight stance looked like a boxer. He sometimes had to calm Reno down. |
|
|
|
|
|
|
|
|
|
|
|
|
|
|
Elena
Bio:
The newest Turk was a female one.
She was erratic, as Reno put it, and she had a lot to learn about being a Turk but she was still strong. She really had minimal
story input to the game and was usually more a liability than an asset. |
|
|
|
|
|
|
|
|
|
|
|
|
|
|
Bugenhagen
Bio:
Red XIII's grandfather was a
spiritual human. He specialized in knowing about the world, the planet, and materia. Cloud and the group visited him for advice
and he helped them a lot. He constantly floated for some reason, and his most prized possession was his machine that showed
the group the planets and stars. |
|
|
|
|
|
|
|
|
|
|
|
|
|
|
Shera
Bio:
A worker on the Shinra No.26. Shera
ruined Cid's space career by stopping his Rocket from taking off. She felt bad so she let him live with her. She takes all
of Cid's swearing with good spirits because she owes it to him. She's very calm and follows Cid's orders without question.
|
|
|
|
|
|
|
|
|
|
|
|
|
|
|
Elmyra
Bio:
Aeris' adoptive mother. She resided
in Midgar but moved to Kalm later on. She was nice and caring, but she worried about Aeris and didn't want anyone bringing
her into danger. |
|
|
|
|
|
|
|
|
|
|
|
|
|
|
Marlene
Bio:
Barret's daughter was a shy, young
girl. She was Barret's main concern, above saving the planet. She noticed things before anyone else even recognized them.
Not much is known about her but she was special in some way. |
|
|
|
|
|
|
|
|
|
|
|
|
|
|
Zack
Bio:
The 1st class Soldier who befriended
Cloud looked almost like Cloud, except with black hair. While a soldier, he met Aeris and they grew close, but he never returned
to Midgar. His parents in Gongaga hadn't heard from him in 10 years. He wielded the Buster Sword before Cloud took it. |
|
Limit Breaks: Limit Breaks are the super powered attacks that the characters are able to use after they have been
attacked enough times by enemies (doesn’t work if you attack yourself or other party members). They replace the Attack
command in battle and can be saved for as long as you want as long as you do not use the Limit, otherwise it will revert back
to Attack and your limit bar will return to empty.
Limit Bars are the bars with the word Limit above it. Each character in a battle has one and they go up every time you
are attacked. The amount it goes up each attack depends on 2 things. One thing is the severity of the attack, for example,
an attack that does 1000 damage will move your limit bar further to full than an attack on you that does 100. The second thing
that it depends on is your status. If you’re in the status ailment of Fury, then your limit bar will go up twice as
fast. If you’re in the status ailment of Sadness then the limit bar will go up twice as slow. If you are KO’d
(status ailment of Fainted), then your limit bar goes back to empty and obviously since you cannot be attacked while fainted,
it won’t go up. Once a limit bar gets full, you are able to use the limit or limits of the level currently selected.
Limit Levels are the different stages of limit breaks for characters. The higher the level gets, the more effective the
limits get. With the exception of Cait Sith and Vincent, each character has 2 limits for each of the first 3 limit levels.
The fourth level has a single, ultimate limit break. Cait Sith has one limit break for Level 1 and one for Level 2, that is
all for it. Vincent has one limit per level. The first limit for each level is gained immediately after the limit level is
reached, but the second limit is gained by using the first limit of the level a certain number of times (it varies from character
to character). Levels 2 and 3 are reached by defeating a certain number of enemies with the character (usually 80, except
for Vincent). The fourth limit is actually an item you find around the game and you can use it only on the character it’s
meant for and only after the character has obtained every other limit break.
The following information is based on my own counting and experience. All the figures didn’t occur every time I played
it, but they were the majority numbers |
|
|
|
|
|
|
|
|
|
|
|
|
|
|
Complete Character Limit Breaks List |
|
|
|
|
|
|
|
|
|
|
|
|
|
|
Level 1:
Braver- Automatically activated. This involves Cloud jumping up into
the air and vertically slashing a single enemy. Looks like Cloud’s Deathblow attack.
Cross Slash- Activated
by using Braver 8 times. This attack does 3 slashes to a single enemy.
Level 2:
Blade Beam- Activated
after killing 80 enemies with Cloud. This involves Cloud slamming his blade to the ground sending a shockwave to the main
target enemy. The main blast ricochets off sending miniature shockwaves at the other enemies doing slightly less damage.
Climhazzard-
Activated by using Blade Beam 7 times. Cloud slices into a single enemy, then jumps upwards with his sword still in the enemy.
Level
3:
Meteorain- Activated after killing another 80 enemies with Cloud. Cloud spins his blade around then jumps
up into the air and creating meteors with his blade which attack all enemies.
Finishing Touch- Activated
after using Meteorain 6 times. This involves Cloud creating a tornado with his blade which blows all enemies away. Doesn’t
work on bosses of course.
Level 4:
Omnislash- Found in Battle Arena. Get either 64,000 Battle Points
on Disk 1 or 32,000 Battle Points on disks 2 and 3 and buy it there. Cloud slashes at random enemies 15 times in total for
massive damage.
|
|
|
|
|
|
|
|
|
|
|
|
|
|
|
Level 1:
Big Shot- Automatically activated. Barret powers up a big blast and
fires it at a single enemy.
Mind Break- Activated after using Big Shot 9 times. Barret powers up a blast
that…takes away enemy’s Magic Points. Don’t ask me how, he just does.
Level 2:
Grenade Bomb-
Activated after killing 80 enemies with Barret. Barret launches a Grenade into the enemy’s area. It explodes and hits
all enemies.
Hammer Blow- Activated after using Grenade Bomb 7 times. If the attack actually hits, it kills
the enemy in one hit. Definitely doesn’t work on bosses.
Level 3:
Satellite Beam- Activated
after killing another 80 enemies with Barret. This involves Barret crossing lasers across the ground and hitting all enemies.
Anger
Max- Activated after using Satellite Beam 6 times. Barret does 18 shots to random enemies.
Level 4:
Catastrophe-
Found in North Corel in the hut with this lady wearing a hat. If you saved the train from North Corel on Disk 2, she will
give it to you. Barret does 20 strong blasts of energy to random enemies.
|
|
|
|
|
|
|
|
|
|
|
|
|
|
|
*Note: Tifa’s limits are all connected to each other so once you obtain and use her Level 4
limit, it’s best to keep it on there, so you can use all of her limits. When she does her limit, a slot machine-like
thing appears at the bottom of the screen and you either get it on Miss, which makes the limit break miss, Hit! Which makes
it do average damage, and Yeah!!! Which makes it do lots more damage. Her limits, while attacking, don’t always hit
the same enemy all the way through. Oh and if you’re trying to use a limit a certain number of times to get the second
limit of the level, the attack has to either Hit! Or Yeah!!! If it misses, it doesn’t count as it being used
Level
1:
Beat Rush- Automatically activated. Tifa rushes at an enemy and punches them a few times.
Somersault-
Activated using Beat Rush 9 times. After Beat Rush, Tifa then somersaults into the air, kicking the enemy.
Level 2:
Waterkick-
Activated after killing 80 enemies with Tifa. After Somersault, Tifa kicks the middle of the enemy and water comes up out
of nowhere.
Meteodrive- Activated after using Waterkick 7 times. After Waterkick, she picks up the enemy
and slams them to the ground, wrestling style.
Level 3:
Dolphin Blow- Activated after defeating another
80 enemies with Tifa. For her 5th move, she uppercuts the enemy and a…dolphin, yes a dolphin appears. Odd but ok.
Meteor
Strike- Activated after using Dolphin Blow 6 times. While you’re distracted by the weird dolphin, another slot
comes up for Meteor Strike, in which Tifa picks up the enemy and throws them to the ground. Same animation as Meteodrive except
Tifa doesn’t come down with the enemy :P.
Level 4:
Final Heaven- Found in Tifa’s house
in Nibelheim on second and third disk. You play the piano correctly and you get it with a note which I won’t spoil for
you. The piano code is X, S, T, R1+T, R1+S, X, S, T, R1+X, O, X, S, X. For PC users, incorporate the PSX controls into that.
Tifa’s final attack involves her creating a giant energy blast and firing it at all enemies.
|
|
|
|
|
|
|
|
|
|
|
|
|
|
|
Level 1:
Healing Wind- Automatically activated. This cures the entire party for
half their full Hit Points.
Seal Evil- Activated after using Healing Wind 8 times. Aeris casts a spell that
basically stops weak enemies from moving and casting magic. Sort of a stop and silence cast.
Level 2:
Breath
of the Earth- Activated after killing 80 enemies with Aeris (I know I know. Funny). Aeris cures all status ailments.
Fury
Brand- Activated after using Breath of the Earth 7 times. This one is useful, because Aeris fills the other two party
members’ limit bars to the top.
Level 3:
Planet Protector- Activated after killing another 80
enemies with Aeris (ha ha ha ha ha). This limit makes all party members temporarily invincible.
Pulse of Life-
Activated after using Planet Protector 6 times. This restores all party members’ Hit Points and Magic Points and also
fully restores Hit Points and Magic Points to fainted members.
Level 4:
Great Gospel- Oh boy. Ok,
you HAVE to do this on disk one. If you’re not past disk one, don’t ask why you have to do it on disk one :P.
Once you have the Buggy, go back to Costa Del Sol while in the Buggy and take the ship back to the first continent. Go east
from Junon and follow the river until you reach a place where you can cross it. Go north and you’ll see a cave. Go inside
and check how many times you’ve fought. If the number of times you’ve fought has the last two digits the same
(like 388 or 511) then the guy there will give you an item. If you go in with say, 244 and you get a Bolt Ring, go outside,
fight exactly 11 times and go back in. He should give you Mithril. If he gives you Mithril first time, lucky you. Oh and sometimes
he just says how many times you’ve escaped or whatever, so go outside, battle once and go back in. After getting the
Mithril, go through the game and get the Tiny Bronco. Once you have that, go to the right of Gold Saucer and you’ll
see a hut. Go in the hut and give the guy there the Mithril. Then go to the second floor and open the safe-like thing there
to get Great Gospel. This makes all party members invincible for the battle and restores all their Hit Points and Magic Points.
|
|
|
|
|
|
|
|
|
|
|
|
|
|
|
Level 1:
Sled Fang- Automatically activated. Red XIII dashes at and attacks a
single enemy.
Lunatic High- Activated after using Sled Fang 9 times. Red XIII casts Haste on the whole party.
Level
2:
Blood Fang- Activated after defeating 80 enemies with Red XIII. Red XIII dashes at a single enemy and
his Hit Points and Magic Points are regained according to the opponent’s Magic Points.
Stardust Ray-
Activated after using Blood Fang 8 times. This involves Red XIII sending 10 star-shaped things at all enemies.
Level
3:
Earth Rave- Activated after defeating another 80 enemies with Red XIII. In this limit, Red XIII casts
Haste, Berserk and some sort of power increase on himself and randomly attacks enemies.
Howling Moon- Howling
Moon – Activated after using Earth Rave 6 times. Red XIII…howls at the moon (yes, like the name) and then hits
up to 5 enemies at once.
Level 4:
Cosmo Memory- Located in the ShinRa Mansion. Go to the safe at the
top left part of the second floor. Press the ok button on it and you will now have 20 seconds to open the safe. Go right to
36 and press the ok button on it, then go left to 10, press ok, then right to 59, press ok and finally, right to 97. After
that the safe will unlock and you’ll fight the boss Lost Number. If you’re at a low level it will be difficult,
as the guy has 8000 HP and can attack with some high damage. After beating it, you get Cosmo Memory. This limit involves Red
XIII attacking all enemies once for very high damage.
|
|
|
|
|
|
|
|
|
|
|
|
|
|
|
Level 1:
Dice- Automatically activated. 1 to 6 dice are thrown on the field.
(number of dice thrown depends on level) The damage done is the sum of the dice numbers multiplied by 100.
Level 2:
Slots-
Activated after using Dice 8 times. A slot appears on the screen. There are six things that can happen.
1. Joker-
You don’t want this. This attack destroys your entire party. I don’t know why there’s an attack that does
that, but it’s there.
2. Random Summon- This basically summons a random summon you currently have with you.
It doesn’t use up the summon’s number of times it can be in a fight either.
3. Lucky Gal- Though it
doesn’t really say it, it gives you more chance to get a critical hit during the battle.
4. All Over- Completely
destroys the enemies (not bosses)
5. Huge Mog- Cait Sith’s stuffed mog that he rides on grows large and smashes
the enemy.
6. Mog Dance- Mog Dance: Fully restores Hit Points and Magic Points to all party members.
|
|
|
|
|
|
|
|
|
|
|
|
|
|
|
Level 1:
Boost Jump- Automatically activated. Cid just jumps into the air and
slashes downwards with his spear.
Dynamite- Activated after using Boost Jump 9 times. This one is cool.
Cid uses his cig to light a stick of dynamite which he hurls into the enemies hitting all of them.
Level 2:
Hyper
Jump- Activated after decimating 80 enemies with Cid. This is like Boost Jump, except when Cid lands, an explosion
occurs for some strange reason and it hits all enemies.
Dragon- Activated after using Hyper Jump 8 times.
Cid sends a dragon at the enemy absorbing some of their Hit Points and Magic Points.
Level 3:
Dragon Dive-
Activated after defeating another 80 enemies with Cid. In this limit, Cid does 6 super powered Boost Jumps.
Big Brawl-
Activated after using Dragon Dive 7 times. Cid slashes random enemies with his spear for 8 times.
Level 4:
Highwind-
Found in the crashed Gelnika plane underwater in the lab room to the far left of the plane. (near the broken helicopter) Cid
summons the Highwind to drop a total of 18 bombs on all enemies.
|
|
|
|
|
|
|
|
|
|
|
|
|
|
|
Level 1:
Greased Lightning- Automatically activated. Yuffie dashes at a single
enemy and slashes hard with her weapon.
Clear Tranquil- Activated after using Greased Lightning 8 times.
All other party members’ Hit Points are restored.
Level 2:
Landscaper- Activated after defeated
80 enemies with Yuffie. Yuffie damages all enemies by creating a sort of Earthquake under them.
Bloodfest-
Activated after using Landscaper 7 times. Yuffie attacks all enemies for a total of 10 times.
Level 3:
Gauntlet-
Activated after killing another 80 enemies with Yuffie. In this limit, Yuffie launches a large bomb at all enemies.
Doom
of the Living- Activated after using Gauntlet 6 times. Yuffie attacks 15 times to random enemies.
Level 4:
All
Creation- Acquired after beating Godo in the Wutai Pagoda and finishing the Yuffie side-quest. Yuffie unleashes a powerful
beam of energy on all enemies.
|
|
|
|
|
|
|
|
|
|
|
|
|
|
|
*Note: Vincent’s limits involve him transforming in savage beasts with a HP increase too. When
you use one of Vincent’s limits, he will retain his beast form for the duration of the battle, even if he faints and
is revived. Take it into consideration.
Level 1:
Galian Beast- Automatically activated. Vincent morphs
into a beast-like creature. He has two attacks which you cannot control.
1. Berserk Dance- Vincent hits a single
enemy with a few slashes.
2. Beast Flare- He Jumps up and fires some bomb-like things at all enemies.
Level
2:
Death Gigas- Activated after killing 60 enemies with Vincent. Vincent morphs into a sort of Frankenstein
thing. Has two attacks that you cannot control.
1. Giga Dunk- Kinda like Beserk Dance but it does more damage.
2.
Livewire- Uses a form of fire damage on all opponents.
Level 3:
Hellmasker- Activated after
destroying another 60 enemies with Vincent. Vincent morphs into a weird looking monster with a chainsaw and hockey mask which
also has an attack that, yes, you cannot control.
1. He attacks enemies 5 times and puts status ailments on them too.
Level
4:
Chaos- You can get this on Disk 3 only. Get Vincent in your party and go to the Waterfall ring on the
second continent with either a chocobo or Submarine. Go inside the waterfall. You’ll see Lucrecia and a whole little
storyline will be shown. You then leave the waterfall. (that part can be done on Disk 2 but it’s quicker on Disk 3)
Go back into the waterfall straight away and walk up to the alter. Vincent will say something and you’ll receive his
final limit and final weapon. Chaos turns Vincent into a winged being which looks pretty cool. It attacks with two attacks,
which, of course, you can’t control :P.
1. Chaos Saber- A powerful fire blast to all enemies.
2. Satan
Impact- Looks different but still does fire damage to all enemies.
|
 |
|
I NEED A BREAK.... man this fire is hot!
good thing i have Ice on me!
|
What a job!
Man, THAT WAS HARD WORK PUTTIN ALL OF THAT IN!
|
|
|
|
|